
I remember the first time I tipped over on a visual approach to Runway 34 at the waypoint SHEED at YMML/Melbourne. The northerly was howling, we were heavy, and in continuous moderate turbulence. Things were busy, but under control.
At the commencement of the visual segment, we were level at 2500’ and partially configured to fly a normal decelerated, 3-degree approach. Local operators know you need closer to 4 to find ‘the groove’ by the stable call at 1000 feet. The trouble was, we weren’t local.
Instantly it became apparent 3 degrees would not be enough. The ‘bouncy ball’ (an Airbus acronym for vertical path indicator) immediately showed we were high.
And just like that, we were chasing.
Jet operators are accustomed to this ol’ chestnut: you can’t slow down and go down. Generally speaking, it’s one or the other. We were now trying to do both.
And then came the turn to final.
We disregarded Melbourne’s secondary airport to our right, with its name emblazoned brightly in white next to the runway so as to avoid any potential confusion (it has happened). As we struggled to configure and complete our landing checklist, workload soared. The final turn came late and required the maximum angle of bank our stabilised approach criteria allowed.
As we turned into 40kts of wind on the nose, our fate was sealed – the auto thrust (by design) applied a fist full of power to compensate for our falling groundspeed, and three whites on the PAPI quickly became four.
We were done. Out of altitude and out of time, we called unstable and commenced the go-around wandering how two competent pilots had let this get the best of us.
Moral of the story – visual approaches (when unfamiliar) aren’t easy. They’re supposed to be, but they’re not.
And business jet operators are the leaders in operating high-performance aircraft to unfamiliar airports.
Enter the guided visual.
Guided visuals make use of the FMS to provide guidance that keeps you on profile and track, reducing pilot workload and allowing you spare capacity to watch for other traffic, configure and all the other pilot-y things we need to do.
But it’s important you’re familiar with their limitations – and what responsibilities still lie with you.
Let’s take a closer look…
Guided Visual 101
It helps to frame what we’re talking about here.
Guided visual approaches are visual approaches flown with lateral and vertical guidance generated by the FMS. Think of it as an assisted visual approach, backed up by RNP-AR style vertical and lateral guidance.
Important point: you’re still flying a visual approach, in VMC, to a runway that’s in sight. But instead of eyeballing things, the box builds you a stabilised path to the threshold.
You can fly it like any other automated approach with full situational awareness. It’s computerised magic, but with some fairly strong caveats (more on that in a bit).
Why they’re so useful
Firstly because they’re so stable. Guided visuals reduce the need for ‘dive and drive’ visuals. You get a proper descent profile early, which enables you to manage energy with far fewer last minute flight path adjustments. They are smart and can take into account the various vertical profiles for different segments of the approach.
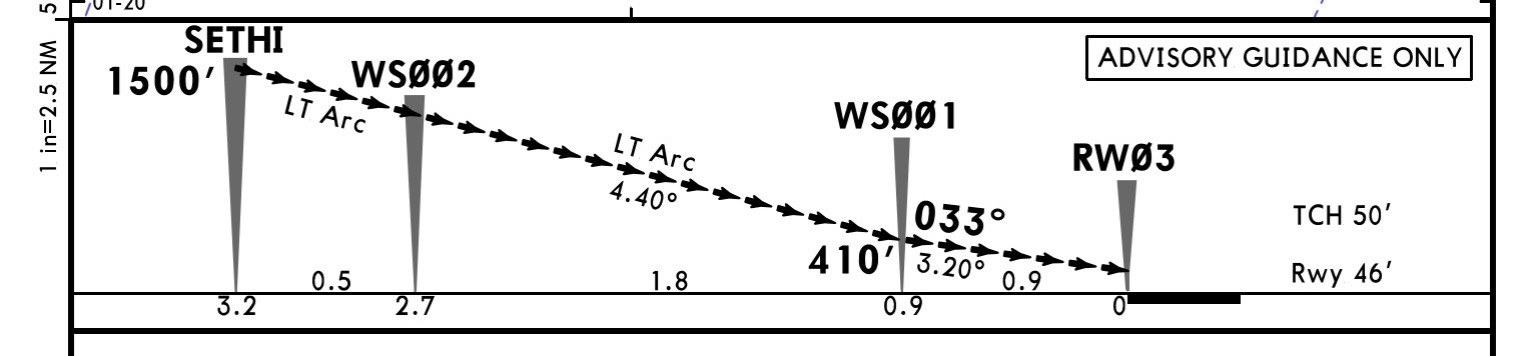
Take WSSL/Seletar Runway 03: the initial descent path from SETHI starts at 4.4 degrees until turning final at 410′ where the descent shallows out to match the PAPI at 3.2 degrees, and since there is a runway point in the FMS, the aircraft can remain coupled until it reaches its autopilot limitation altitude (200′ in a Gulfstream for instance).
Then there’s workload – the FMS empties your capacity bucket by managing your geometric flight path, leaving room to focus on things like spacing, configuration, checklists and monitoring. This is especially pertinent when cleared via a visual approach while still high, fast or under (shall we say) ‘less than optimal’ radar vectors.
Then there are visual illusions caused by flat light, water, sloping terrain or black hole effect. Our eyes are known to play tricks on us.
Finally, the elphant in the room – automation. Modern, complex aircraft are designed to be flown with high levels of automation. Whether or not this is a good thing is a can of worms that falls beyond the scope of this article. But automation is well and truly engrained in how we operate modern, complex aircraft.
It’s hard to argue that when managed well (and not used as a replacement for core piloting skills), autopilot and flight director coupling provides significant safety margins compared to simply flying by the seat our pants.
But, beware…
Rubbish in, rubbish out. The guidance an FMS provides is only as good as the data it uses, and so database accuracy matters. A displaced threshold for instance may not be captured. Always, always cross-check your approach against visual cues such as PAPI.
It’s also important to remember that obstacle clearance is on you. It’s still a visual approach. Your FMS doesn’t know about obstacles, cranes or even the ‘steel structures and silos’ that you must spot on approach to WSSL/Seletar, for instance.

Singapore’s Seletar Runway 03 RNAV-H
What’s the bottom line? Guided visual approaches do not replace good visual flying. But they do help make it safer, more stable and more consistent. For BizAv operators flying to diverse airports, they can be one of the most useful tools in the box – provided they are understood.
What about legalities?
In the US, a guided visual approach is still a visual approach under FAA rules. The FAA previously issued this Information for Operators (InFO) to that effect, and is an important read before flying any guided visual.
Don’t confuse them with instrument approaches – even if the charts appear similar. “Looks like an approach” doesn’t equal “is an approach.”
In other words, the presence of flight director and autopilot guidance does not change anything.
There is no such thing as an ‘instrument visual approach.’
Visual approaches have no published minima. There is no FAA obstacle clearance protection, no TERPS validation or any other underlying regulatory protections. The same applies in the ICAO world, whilst you might have access to the visual guided approach, it is still legally a visual approach, don’t let the chart fool you into thinking otherwise.
You must:
- Maintain continuous visual reference with the runway or traffic.
- Be able to land using normal manoeuvres.
The FAA doesn’t specify whether you need to be head’s up or down – just as long as you remember that these remain your responsibility.
Another important clarification is that most guided visual approaches are proprietary, in other words not published via AIP. Avoid potential confusion by not using using weird naming conventions (such as “RNP-H”) that might not be immediately evident to the controller that has cleared you for a visual approach.
If you are specifically asked by ATC if you will be tracking via a procedure however, it is okay to say so. At several US airports ATC have been actively involved in procedural design. This highlights the benefits of these types of approaches, not just for pilots but for controllers too. They can help remove the “some fly wide, some fly close” factor which is common in a visual approaches.
And finally there is this important caveat. Flying one of these RNAV H or RNAV G procedures does not relieve the pilot of their responsibilities of right-of-rule rules – especially at uncontrolled airports where pattern rules still apply (see CFR § 91.113). The NBAA report that they are receiving increasing reports of turbine aircraft using instrument approaches to complete visual arrivals and (either intentionally or unintentionally) disregarding right-of-way rules with other aircraft. It’s important to understand that using these procedures does not grant any extra priority.
Where do you find them?
In the US, guided visual approaches are not usually published procedures.
Instead third party vendors produce ARINC-424 coded procedures that can be used in your jet’s FMS. Just like an RNP-AR, you should not modify waypoints on the approach, since this could affect the jets trajectory.
When loaded, they usually appear in your FMS as ‘RNAV-H RWY XX’ or ‘RNAV-G RWY XX’ depending on which avionics package you are flying with.
Honeywell appears to be leading the charge. They have designed a number of them which, at the moment, are only available to aircraft with Honeywell avionics. Although we have been told that the data may soon be licensed to other avionic manufacturers the likes of Collins etc. Watch this space.
Garmin has also recently started to add some Visual Guided procedures to their products as well. While the number of airports served is less than the Honeywell offering, their offering is growing quickly
Have more to add?
Let us know! You can reach the team via blog@ops.group.
More reading:
- Latest: Gander’s Bringing Back CPDLC Oceanic Reroutes
- Latest: EU Temporary Admission of Aircraft – Busting Myths
- Latest: US Ops Update: Speeds, Squawks and Slippery Runways
- Safe Airspace: Risk Database
- Weekly Ops Bulletin: Subscribe
- Membership plans: Why join OPSGROUP?


Unless I’m not understanding something correctly, auto throttles don’t maintain a groundspeed. They only maintain airspeed. Possibly a wind lull caused the airspeed to drop and the auto throttles to advance at the wrong time?
Regardless, very good information here. I would say most established operators worth their salt have a policy requiring lateral and vertical guidance to the runway whether it is conducted in IMC or VMC. This could be a straight in instrument approach, a guided visual as described in this article, or lateral and vertical guidance built using the FMS. Building lateral and vertical guidance to the runway requires you to know your FMS. Garbage in is garbage out, and your workload increases tenfold.
The FAA, TC, and EASA have been emphasizing continuous descent approaches for quite some time. If you don’t have a policy/SOP, then get one. It will save you stress, embarrassment, and money.
Hi Greg, thanks for the feedback and we will add to the article, much appreciated. The aircraft in that story was an Airbus A320 which utilise a feature called ‘groundspeed mini’ – fairly unique to that type.
I see interesting. I’m going to have to google that. I operate an aircraft with auto throttles, but it does not look at groundspeed at all. Thanks for the explanation.
EASA has published some guidance about guided visual (or RNP VPT in ICAO documents):
Webinar: https://www.easa.europa.eu/en/newsroom-and-events/events/required-navigation-performance-visual-prescribed-track
SIB: https://ad.easa.europa.eu/blob/EASA_SIB_2025_05.pdf/SIB_2025-05_1
See also FAA InFO 23011